
In this webhosting video tutorial I will walk through setting up Varnish Caching service on a Bitnami based WordPress website within the AWS Lightsail platform.
Varnish is an http accelerator or caching service that acts like reverse proxy so it sits in front of Apache/PHP and its’ primary purpose is to take static access like JavaScript files, Images, CSS files, font files and other static files assets and store them in memory so that when a visitor requests a page that contains those assets then varnish steps in and delivers those files from memory instead of WordPress/Apache taking the load. As a result this should ideally reduce load on your server and as a result improve the website performance. The amount of improvement you’ll see will be relative and depends on many factors and so caching is just one of the aspects. But let’s see what improvements we’ll see in this video so without further ado let’s get started.
NOTES:
- If you have some unique plugins / customizations on your wordpress website or instance then below are links to community forums that may help.
- If you will be enabling this on an existing website, I would suggest you do this on a brand new instance and then migrate your wordpress website. You can do this in a couple of ways.
- Take a Lightsail snapshot and create a new instance from the snapshot
- Backup your wordpress site using WP DB Migrate Pro or similar plugin and restore on a new WordPress instance
- There are couple of other steps that can you which are optional
- Currently Apache is running on port 80 and varnish on port 81. You can switch this these ports with this link:
Steps from the video:
- Create your instance from snapshot if existing website or create new instance in Lightsail
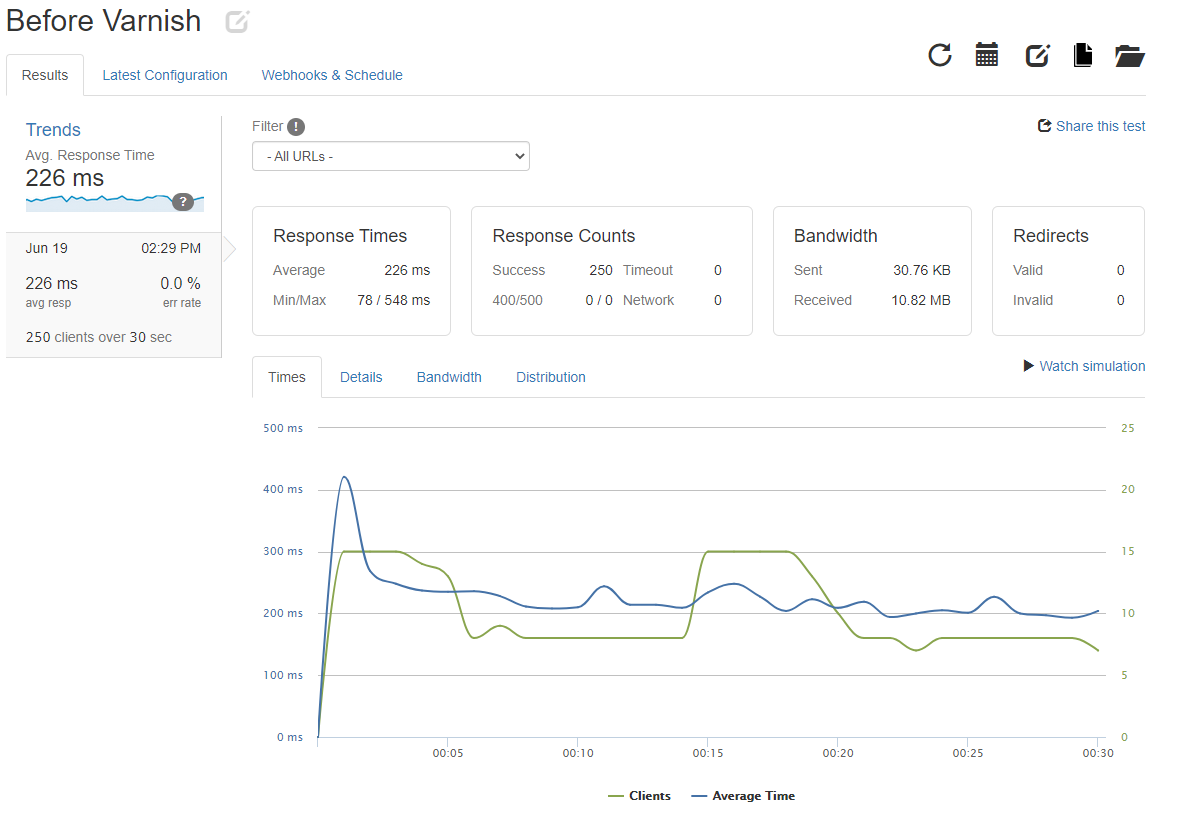
- Load Test before Varnish using Loader.io Performance Test Tool
- SSH into your instance with Bitvise / PuTTy or AWS web SSH terminal
- Disable PageSpeed
- Open configuration file
sudo vi /opt/bitnami/apache2/conf/httpd.conf
- Comment out following lines
#Include conf/pagespeed.conf
#Include conf/pagespeed_libraries.conf
- Flush cache
sudo touch /opt/bitnami/apache2/var/cache/mod_pagespeed/cache.flush
- Restart Apache
sudo /opt/bitnami/ctlscript.sh restart apache
- Enable Varnish
sudo mv /opt/bitnami/varnish/scripts/ctl.sh.disabled /opt/bitnami/varnish/scripts/ctl.sh
sudo /opt/bitnami/ctlscript.sh start varnish
- Modify /opt/bitnami/varnish/etc/varnish/default.ctl for WordPress optimized configuration
- Make a backup (make you are you in /home/bitnami)
sudo cp /opt/bitnami/varnish/etc/varnish/default.vcl /opt/bitnami/varnish/etc/varnish/default.vcl.backup
- Get the wordpress.vcl file from Bitnami
wget https://docs.bitnami.com/downloads/components/varnish/wordpress.vcl
- Copy the wordpress file into default.vcl file
sudo cp wordpress.vcl /opt/bitnami/varnish/etc/varnish/default.vcl
- Modify the file to point backend host to Apache port (80)
sudo sed -i 's/port\s*=\s*"[^"]*"/port = "80"/g' /opt/bitnami/varnish/etc/varnish/default.vcl
- Restart Varnish
sudo /opt/bitnami/ctlscript.sh restart varnish
- Open port 81 on Lightsail Firewall
- Access the website on port 81
- Verify Cache being Hit with Network headers using browsers Inspect tool
- Check Varnish Log with this command
sudo varnishlog -n /opt/bitnami/varnish/var/varnish/
- You can also use
varnishstatcommand to see information on usage- MAIN.backend_resuse – how often Varnish find content in its cache repository
- MAIN.cache_miss – how many times Varnish fetched content from Apache/PHP
- Enable SSL / HTTPS with Varnish
- Open configuration file
sudo vi /opt/bitnami/apache2/conf/bitnami/bitnami.conf
- Modify HTTPS VirtualHost section and add following lines
ProxyPreserveHost On
RequestHeader set "X-Forwarded-Proto" expr=%{REQUEST_SCHEME}
ProxyPass "/" "http://127.0.0.1:81/"
ProxyPassReverse "/" "http://127.0.0.1:81/"
- Modify wp-config.php and update SITE_URL and HOME_URL as per following:
vi /home/bitnami/apps/wordpress/htdocs/wp-config.php
define('WP_SITEURL', 'http://' . $_SERVER['HTTP_HOST'] . '/');
define('WP_HOME', 'http://' . $_SERVER['HTTP_HOST'] . '/');
if (strpos($_SERVER['HTTP_X_FORWARDED_PROTO'], 'https') !== false) {
$_SERVER['HTTPS']='on';
}
- Restart Apache
sudo /opt/bitnami/ctlscript.sh restart apache
- Test Varnish and Load Test using Loader.io after Varnish setup
- Install WordPress Plugin to automatically purge cache upon content updates
22. Flush Varnish by restarting Varnish as well.
Load Performance Tests:

Video Tutorial:
Additional Links for reference:
- https://docs.bitnami.com/bch/apps/wordpress/configuration/configure-varnish/
- https://docs.bitnami.com/aws/apps/wordpress/administration/configure-use-varnish/#start-varnish-tm
- WordPress with Varnish — Varnish Wiki documentation (varnish-software.com)
- Step-by-step: Speed Up WordPress with Varnish Software (varnish-software.com)
- https://jamie.evawin.uk/how-to-find-out-if-varnish-is-working-on-your-site/
- https://stackoverflow.com/questions/20747210/how-to-check-if-varnish-cache-is-working-correctly
All videos tutorials on the website as well as the YouTube channel aim to provide a simplified process for a specific scenario; there could be many different factors and unique use cases you may have. The tutorials may not cover every situation; so treat is as a starting point or learning concept to apply to your unique situations, and consider this inspiration but not prescription or explicit direction.