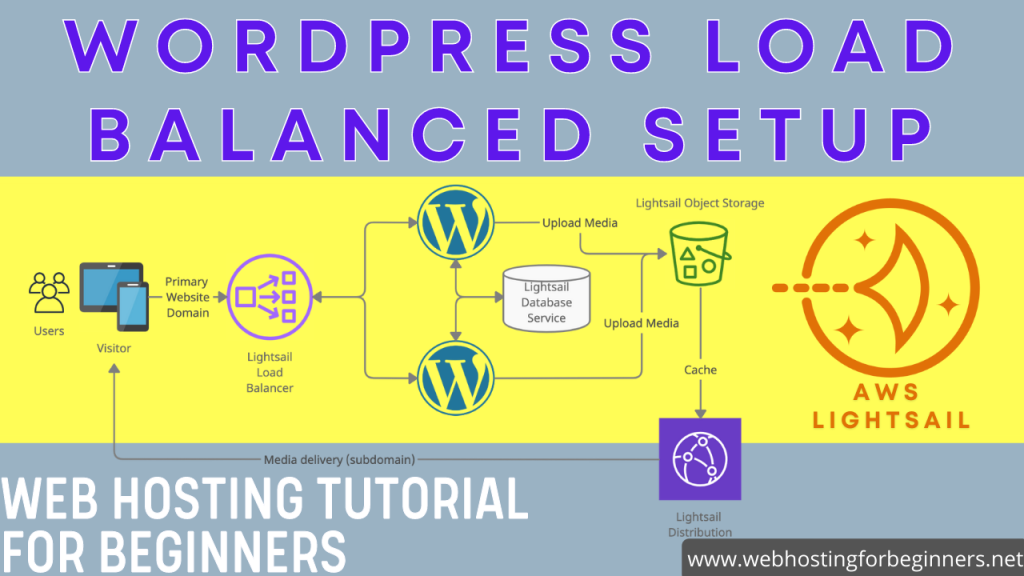
In this video we will walk-through setting up a WordPress cluster environment using Lightsail instances. This follows a tutorial by David Hilditch, I’ll leave a link below. His tutorial is based on Digital Ocean droplets, but we will be doing the same setup using AWS Lightsail instances.
Below is a diagram of the setup.. We will be setting up a 3-instance cluster, each cluster will have WordPress along with the database and media files on the server itself.
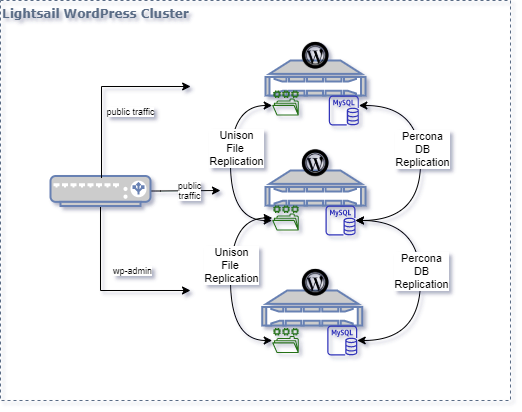
We will use two different replication tools. For the database we will setup Percona for MySQL and for the Files we’ll use a sync tool called Unison. We will then have a 4th lightsail instance that will setup as a load balancer. If you want you can alternativaly use the lightsail loadbalancer. However that comes out at $15US dollars and with this setup you could use start with a $5 instance and work your way up depending on your traffic volume. Also with the load balancer instance, the wp-admin traffic will be configured to go to one server, and the other two instances will be taking only visitor traffic.
This is a neat project but it does require some sysadmin experience and a bit advanced. If you follow the exact instructions it should all work but in case you run into issues you’ll have to troubleshoot it. So without further ado let’s get started.
All the commands and instructions:
# Welcome to the lightsail-wordpress-cluster wiki!
## Instructions, commands and code snippets to use and follow along the Video Tutorial on YouTube.
## Create Four LightSail Ubuntu Servers with the appropriate sizing. Name Three instances WP1, WP2, WP3, and name 4th instance LoadBalancer
##
## Open Ports 443 and 9443 (on LoadBalancer and WP1 in the LightSail Instance networking section)

## Run all commands with root (sudo su)
### Run following on each of the 3 WordPress instances
`ufw allow 80,443,9443,3306,4444,4567,4568/tcp;`

### Percona for MySQL installation on all three WordPress instances
`wget https://repo.percona.com/apt/percona-release_latest.$(lsb_release -sc)_all.deb`

`dpkg -i percona-release_latest.$(lsb_release -sc)_all.deb`

`apt-get update`

`apt-get upgrade`

`apt-get install percona-xtradb-cluster-57`

### Mysql Replication setup. Use the password setup during Percona Installation
`mysql -u root -p`

### Create Replication user on all three WordPress Instances.
### Following statements will be run in the mysql cli
`CREATE USER 'sstuser'@'localhost' IDENTIFIED BY 'password';`

`GRANT RELOAD, LOCK TABLES, PROCESS, REPLICATION CLIENT ON *.* TO 'sstuser'@'localhost';`

`FLUSH PRIVILEGES;`

exit out of mysql cli

`quit`

`service mysql stop`

On WP1, customize the Percona cluster configuration file

`vi /etc/mysql/percona-xtradb-cluster.conf.d/wsrep.cnf`

Modify the parameters in the configuration file as per the video and make this change on all three WordPress instances

_Keep in mind that on each node the param wsrep_node_address will be that servers' private ip address_

```
[mysqld]
# Path to Galera library
wsrep_provider=/usr/lib/galera3/libgalera_smm.so

# Cluster connection URL contains IPs of nodes
#If no IP is found, this implies that a new cluster needs to be created,
#in order to do that you need to bootstrap this node
wsrep_cluster_address=gcomm://all_three_private_ips_of_wp_instances_seperated_by_comma

# In order for Galera to work correctly binlog format should be ROW
binlog_format=ROW

# MyISAM storage engine has only experimental support
default_storage_engine=InnoDB

# Slave thread to use
wsrep_slave_threads= 8

wsrep_log_conflicts

# This changes how InnoDB autoincrement locks are managed and is a requirement for Galera
innodb_autoinc_lock_mode=2

# Node Private IP address
wsrep_node_address=ip_of_wp_instance
# Cluster name
wsrep_cluster_name=pxc-cluster

#If wsrep_node_name is not specified,  then system hostname will be used
wsrep_node_name=pxc-cluster-node-1

#pxc_strict_mode allowed values: DISABLED,PERMISSIVE,ENFORCING,MASTER
pxc_strict_mode=ENFORCING

# SST method
wsrep_sst_method=xtrabackup-v2

#Authentication for SST method
wsrep_sst_auth="sstuser:password"
```
### Start your Percona Replication on WP1

`/etc/init.d/mysql bootstrap-pxc`

### Check if the Cluster is running with following commands
```
mysql -u root -p
show status like 'wsrep%';
```

### Start MySQL on WP2 and WP3 instances with this command

`/etc/init.d/mysql start`

### Install Nginx, PHP on all three WordPress intances
**Run all the above commands using this single line install command**

`apt-get install -y nginx php7.0 php7.0-curl php7.0-gd php7.0-intl php7.0-mysql php-memcached php7.0-mbstring php7.0-zip php7.0-xml php7.0-mcrypt unzip`

### Install Unison for file replication

`apt-get -y install unison openssh-server`

### Setup SSH between all three servers.
**_run as root and on all three servers_**

`ssh-keygen`

_Press enter 3 times to accept 3 defaults values (2 blank passwords for the keyfile so it works non-interactively)_

**For each server copy the pub key stored in id_rsa.pub into the authorize_keys file for the other two servers**
_Ensure the entire key copied is on one line (no linebreaks or spaces)_

`cat /root/.ssh/id_rsa.pub`

**Then paste those public keys into the authorized_keys file of the other 2 instances**

`vi /root/.ssh/authorized_keys`

### Authenticate and ssh into each server.
**on WP instance 1, connect to instance 2, and instance 3**
```
ssh ip_of_wp2
ssh ip_of_wp3
```
_type yes for accepting the connection_

**Do the same on instance 2 and instance 3 with corresponding instances**

### Run unison replication on WP1 only

`unison /var/www ssh://ip_of_wp2//var/www -owner -group`

`unison /var/www ssh://ip_of_wp3//var/www -owner -group`

### Setup cron for replication
```
crontab -e
* * * * * unison -batch /var/www ssh://ip_of_wp2//var/www &> /dev/null
* * * * * unison -batch /var/www ssh://ip_of_wp3//var/www &> /dev/null
```

# Get wordPress installation files On WP1 ONLY
_**Replace mukesh.me below with your websites domain name**_

```
wget https://wordpress.org/latest.zip -P /var/www/
unzip /var/www/latest.zip -d /var/www/
mv /var/www/wordpress /var/www/mukesh.me
chown www-data:www-data /var/www/mukesh.me -R
rm /var/www/latest.zip
```

### Get the NGINX Configuration files from github repo on all three WP instances
```
git clone https://github.com/mukeshwani/lightsail-wordpress-cluster /root/lightsail-wordpress-cluster/
cp /root/lightsail-wordpress-cluster/etc/nginx/* -R /etc/nginx/
```
**MODIFY THE CONF FILE WTIH THE NEW DOMAIN**

`vi /etc/nginx/sites-available/lightsailwp.cluster.conf`

**Continue with nginx configuration**

```
ln -s /etc/nginx/sites-available/lightsailwp.cluster.conf /etc/nginx/sites-enabled/
mkdir /sites/mukesh.me/cache -p
service nginx restart
```
### Setup Load Balancer
**SSH into the LoadBalancer instance
```
sudo su
add-apt-repository ppa:nginx/stable
apt-get update
apt-get install nginx
```
**Modify the loadbalancer.conf**

`vi /etc/nginx/conf.d/loadbalancer.conf`

**Copy following into the file and modify the lines where indicated**

```
upstream clusterwpadmin {
## replace the follwing with Private IP of your server 1
     server ip_of_wp1;
}
upstream clusternodes {
     ip_hash;
     ## replace the follwing with Private IP of your server 2
 server ip_of_wp2 max_fails=3;
 ## replace the follwing with Private IP of your server 3
 server ip_of_wp3 max_fails=3;
}
server {
     listen 80;
# this block is for letsencrypt
 root /var/www/html;
 location ~ /.well-known {
      allow all;
  try_files $uri $uri/ =404;
 }
 server_name _;
 ## Uncomment the next line after Lets Encrypt Cert has been setup
 #return 301 https://$host$request_uri;
 location ~ /wp-(admin/|login\.php\b|cron\.php) {
     proxy_pass http://clusterwpadmin;
 proxy_set_header X-Forwarded-Host $host;
 proxy_set_header X-Forwarded-Server $host;
 proxy_set_header X-Forwarded-For $proxy_add_x_forwarded_for;
 proxy_set_header X-Forwarded-Proto $scheme;
 proxy_set_header X-Real-IP $remote_addr;
 proxy_set_header Host $host;
 }
location / {
     proxy_pass http://clusternodes;
 proxy_set_header X-Forwarded-Host $host;
 proxy_set_header X-Forwarded-Server $host;
 proxy_set_header X-Forwarded-For $proxy_add_x_forwarded_for;
 proxy_set_header X-Forwarded-Proto $scheme;
 proxy_set_header X-Real-IP $remote_addr;
 proxy_set_header Host $host;
 }
}
server {
## Uncomment the next three lines after Lets Encrypt Cert has been setup
 #   listen 443 ssl;
 #ssl_certificate /etc/letsencrypt/live/yourdomain.com/cert.pem;
 #ssl_certificate_key /etc/letsencrypt/live/yourdomain.com/privkey.pem;
location ~ /wp-(admin/|login\.php\b|cron\.php) {
     proxy_pass http://clusterwpadmin;
 proxy_set_header X-Forwarded-Host $host;
 proxy_set_header X-Forwarded-Server $host;
 proxy_set_header X-Forwarded-For $proxy_add_x_forwarded_for;
 proxy_set_header X-Forwarded-Proto $scheme;
 proxy_set_header X-Real-IP $remote_addr;
 proxy_set_header Host $host;
 }
location / {
     proxy_pass http://clusternodes;
 proxy_set_header X-Forwarded-Host $host;
 proxy_set_header X-Forwarded-Server $host;
 proxy_set_header X-Forwarded-For $proxy_add_x_forwarded_for;
 proxy_set_header X-Forwarded-Proto $scheme;
 proxy_set_header X-Real-IP $remote_addr;
 proxy_set_header Host $host;
 }
}
#if a user connects to yourdomain.com:9443 they will be directed to node 1. This is where admins should connect to add plugins etc.
server {
## Uncomment the follwing line after Lets Encrypt Cert has been setup
  #   listen 9443 ssl;
 server_name _;
## Uncomment the next two lines after Lets Encrypt Cert has been setup
 #ssl_certificate /etc/letsencrypt/live/yourdomain.com/cert.pem;
 #ssl_certificate_key /etc/letsencrypt/live/yourdomain.com/privkey.pem;
location / {
     proxy_pass http://clusterwpadmin;
 proxy_set_header X-Forwarded-Host $host;
 proxy_set_header X-Forwarded-Server $host;
 proxy_set_header X-Forwarded-For $proxy_add_x_forwarded_for;
 proxy_set_header X-Forwarded-Proto $scheme;
 proxy_set_header X-Real-IP $remote_addr;
 proxy_set_header Host $host;
 }
}
```
**Restart nginx**

`service nginx restart`

### Setup SSL on the Load Balance server
**replace mukesh.me domain with your websites domain**
```
add-apt-repository ppa:certbot/certbot
apt-get update
apt-get install certbot
certbot certonly --webroot --webroot-path=/var/www/html -d mukesh.me -d www.mukesh.me
```

**Once you get a congratulations message, Go Back to loadbalancer.conf and un-comment lines**

`vi /etc/nginx/conf.d/loadbalancer.conf`

_**Uncomment ssl_certificate lines in both plaes, uncomment the listen lines in all places. Uncomment the return 301 line as well**_

`service nginx restart`

### Installation of wp begins now
```
mysql -p (or just mysql if no root password)
create database wpdb;
create user 'wpuser'@'localhost' identified by '$TGWREGQ$T#$TGRG#$TRAGAG';
grant all privileges on wpdb.* to wpuser@localhost;
```

### Install wordpress from the domain.
https://yourdomain.com


### Disable cron on all three WP instances and just turn on for WP1

`vi /var/www/yourdomain.com/wp-config.php`

**Add following code in wp-config**

```
define('WP_DISABLE_CRON', true);
if (strpos($_SERVER['HTTP_X_FORWARDED_PROTO'], 'https') !== false) {
 $_SERVER['HTTPS']='on';
}
```
**Setup cron on WP1**

`crontab -e`

`* * * * * wget https://mukesh.me:9443/wp-cron.php?doing_cron &> /dev/null`

### Thats it! Well done!!
GitHub with NGinx Configuration Files and Diagrams: https://github.com/mukeshwani/lightsail-wordpress-cluster
Link to David Hildhitch’s tutorial on Dream Ocean: https://www.wpintense.com/2018/01/09/setting-up-a-wordpress-cluster-for-huge-sites/
All videos tutorials on the website as well as the YouTube channel aim to provide a simplified process for a specific scenario; there could be many different factors and unique use cases you may have. The tutorials may not cover every situation; so treat is as a starting point or learning concept to apply to your unique situations, and consider this inspiration but not prescription or explicit direction.